Stable Diffusion is a text-to-image model that is capable of creating unique and high-quality images based on natural language descriptions.
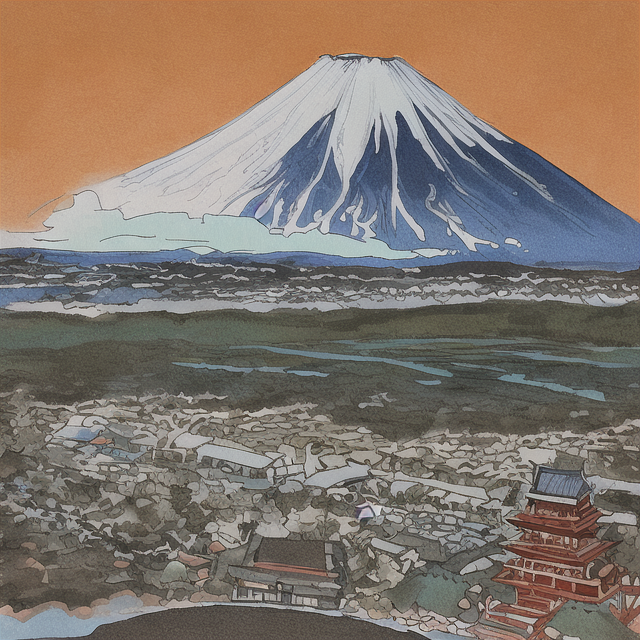
This is Stable Diffusion’s output for “mount fuji” using the Anything v3.0 model:
This image was not selected out of a batch of several images; it’s the first one that generated. You can improve the output using more, better tags as well as negative prompting and using highres fix.
This guide is intended for people with decent (4GB VRAM or greater) NVIDIA GPUs. If you want to run it on your CPU or an AMD card, you still have options, but I won’t explain them here.
stable-diffusion-webuiUse git clone:
git clone https://github.com/AUTOMATIC1111/stable-diffusion-webui/
or download it as a .zip file here.
Here is a list of models you can try:
You only need one, but if you want to try others that’s an option.
Once downloaded, move/copy/drag your .ckpt file(s) into the stable-diffusion-webui/models/Stable-diffusion/ folder. In my case, the command is:
[carter@desktop ~]$ cp Anything-V3.0-pruned.ckpt stable-diffusion-webui/models/Stable-diffusion/
Now, we need to start the server for the first time. Run webui.bat if you’re on Windows, or run webui.sh if you’re on Mac/Linux.
It should begin to install pytorch and all the required software. If it doesn’t, you probably have the wrong version of Python, in which case you need to uninstall your current version of Python and reinstall Python 3.10.
After the installation is complete, you should see the command-line output http://127.0.0.1:7860. Open it in a browser and you will see a page that looks like this:

xformers is a Python library that can give stable diffusion a large (40% for me) speed boost. I believe this requires NVIDIA’s CUDA Toolkit, so go ahead and install that if you haven’t already. Then, just install xformers with pip:
pip install xformers
Now, edit webui-user.bat and add --xformers to COMMANDLINE_ARGS:
...
set COMMANDLINE_ARGS=--xformers
...
Edit ui-config.json in the base stable-diffusion-webui folder. I’ll use nvim:
nvim stable-diffusion-webui/ui-config.json
In my case, I want a sensible negative prompt to appear in the UI by default. I also want the default sampler to be DDIM (perhaps the best one, you should use it):
{
    ...
    "txt2img/Negative prompt/value": "lowres, bad anatomy, bad hands, ugly, text, error, missing fingers, cropped, out of frame, low quality, jpeg artifacts, oversaturated, extra limbs, boring",
    ...
    "txt2img/Sampling method/value": "DDIM",
    ...
}
Open the webui and go to “Settings”. There, search for “creation” (use ctrl-f). Drag this slider to 1:
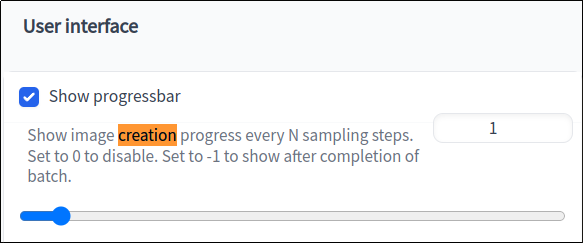
Then restart the webui by closing the console window and running webui.bat again. Now, when you generate an image, it will show the image’s progress as it is being generated:
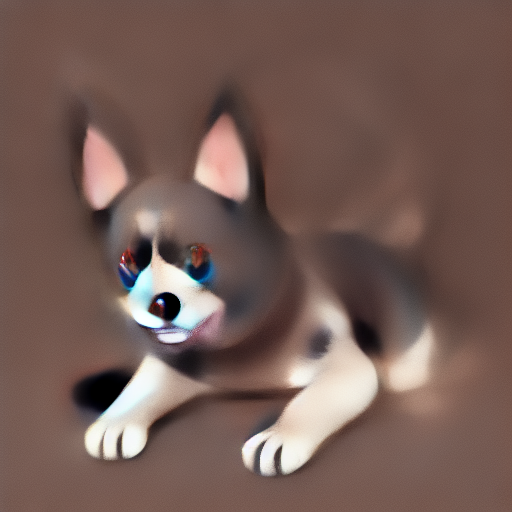
How terrifying!
Happy diffusing!